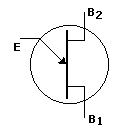
Testing a UJT
Uni Junction
Transistor
This testing procedure is for use with a digital multimeter in the OHM's test-range.
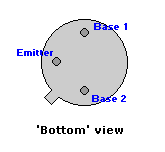
The UJT is a solid-state 3-terminal (TO-18 case) semiconductor.
UJT's are used in pulse/timing, oscillator, sensing, and thyristor triggering circuits. The most common one being
probably the 2N2646 from Motorola.
 UJT testing is pretty easy once you
know how to do it.
1) With a Digital Multimeter, set in the Ohms position, read the resistance between the Base 1 and Base 2; then
reverse the meter-leads and take another reading. Regardless of the meter-lead polarity the measured resistance
should approximately be equal (high resistance).
2) Now connect the negative (-) lead of the ohmmeter to the emitter of the UJT. With the positive (+) lead, measure
the resistance from the emitter to Base 1 and then from the emitter to base 2. Both readings should indicate high
resistance and about equal to each other.
3) Exchange the negative lead to the emitter with the positive lead. Measure with the negative lead the resistance
between emitter and Base 1 and from Base 2 to emitter. Both readings should show low resistance and about equal
to each other.
4) Remember that the 'B1' pin should always be connected to the load and not B2.
I bench tested the following UJT models: 2N2646, NTE6401, ECG6401, 2N2647, NTE6409. Tested with the above testing
procedures. Testing method was accurate. I also tested faulty UJT's of the same make and models. Testing method
was also accurate.
The UJT's main application is (and was) to work with and connect to SCR's. It was especially designed for this purpose.
But with only a couple external components it can produce an oscillator. As previously stated, only the UJT's B1
connection was designed to work with a load. The 'load' is connected between the '0' volt rail and B1. The standard
and more common UJT for many decades was the 2N2646. These days trying to find one can be difficult and expensive.
Back to ..
 UJT testing is pretty easy once you
know how to do it.