Testing a MOSFETMetal Oxide Semiconductor Field Effect Transistor
This testing procedure is for use with a digital multimeter in the diode test-range with a minimum of 3.3 volt over d.u.t. (diode-under-test). If your multi-meter is less than that it will not do the test. Check your meter manual for the specs.
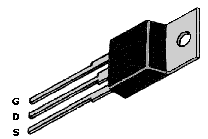 Connect the 'Source' of the MosFet to the meter's negative (-) lead.
1) Hold the MosFet by the case or the tab but don't touch the metal parts of the test probes with any of the other MosFet's terminals until needed.Do NOT allow a MOSFET to come in contact with your clothes, plastic or plastic products, etc. because of the highstatic voltages it can generate.
2) First, touch the meter positive lead onto the MosFet's 'Gate'.
3) Now move the positve probe to the 'Drain'. You should get a 'low' reading. The MosFet's internal capacitance on the gate has now been charged up by the meter and the device is 'turned-on'.
4) With the meter positive still connected to the drain, touch a finger between source and gate (and drain if you like, it does not matter at this stage). The gate will be discharged through your finger and the meter reading should go high, indicating a non-conductive device.
What the test above actually does is testing the cut-off voltage, which is basically the highest voltage put on the gate without making it conduct. Such a simple test is not 100% -- but is useful and usually adequate.
 When MOSFETS fail they often go short-circuit drain-to-gate. This can put the drain voltage back onto the gate where ofcourse it feeds (via the gate resistors) into the drive circuitry, prossibly blowing that section. It will also get to any other paralleled MosFet gates, blowing them also.
So, if the MosFets are deceased, check the drivers as well! This fact is probably the best reason for adding a source-gate zener diode; zeners fail short circuit and a properly connected zener can limit the damage in a failure! You can also add subminiature gate resistors -- which tend to fail open-circuit (like a fuse) under this overload, disconnecting the dud MosFet's gate.
Dying MOSFETS often emit flames or blow-out, even more so in hobby built electronics projects. What that means is that a defective unit can usually be spotted visually. They show a burned hole or 'something black' somewhere. I have seen them alot especially in ups's which can have as many as 8 or more mosfets in parallel. I always replace all of them if a couple are defective plus the drivers.
NEVER use one of those hand held solder-suckers (you know, the ones with a plunger) to desolder a HEX MOSFET. They create enough Electro Static Discharge to destroy a mosfet. Best method is using solder-wick or a professional 'ESD' safe desoldering station.
Below are a couple HexFET applications using an IRF511.
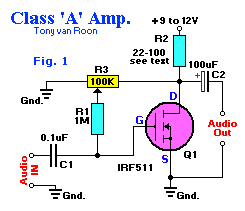
Fig. 1 is configured as a simple Class-A Audio Amplifier. With zero gate bias applied, Q1 is like switch in the off state, so no current flows through the load resistor R2.Ideally speaking, the voltage across Q1 and the load resistor should be equal for class-A operation. A 100K potentiometer (R3) and a 1-MegaOhm fixed resistor (R1) maker up a simple adjustable gate-bias circuit. Plase a voltmeter between the Drain (D) of Q1 and the circuit ground, and adjust R3 for a meter reading of half the power supply voltage.
Almost any resistor value can be used for R2 as long as the maximum current and power ratings of the FET are not exceeded. A resistor value between 22 and 100 ohms is a good choice for experimenting. At high currents, a suitable heat sink should be used.
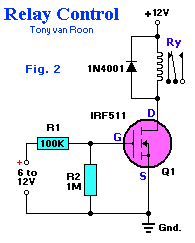
Fig. 2 has the power FET setup as a Relay-Controller. With zero-gate bias applied, Q1 acts lilke an open switch, but when a DC voltage greater than 5 volts is applied to the input of the circuit, Q1 turns on, completing the relay circuits and therby activating the relay coil.
The input bias current required to turn on Q1 and operate the relay is less than 10 µA (microAmps), which is about1/1,000,000 of the current required to bias the popular 2N3055 power transistor to operate the same relay.
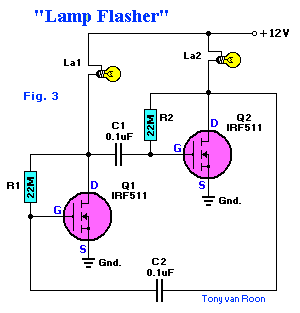
Fig. 3 is shown as a regular Incandescent Lamp Flasher using two IRF511 HexFets which are configured as a simpleastable multivibrator to alternately switch the two lamps, La1 and La2, on and off. The R & C values given set the flash rate to about 1/3 Hz. By varying either the resistor or capacitor values almost any flash rate can be obtainded. Increase either C1 and C2, or R1 and R2, and the flash rate slows. Decrease them and the rate increases.
Unlike most semiconductor devices, the power MosFet can be paralleled, without special current-sharing components, to control larger load currents. That can be an important feature when the device is used to turn on incandescent lamps,because the lamp's cold resistance is much lower than the normal operating resistance.
A typical #1815 12 to 14-volt lamp measures 6 ohms cold. When 12 volts is applied, the initial current drawn is 2 amps.The same lamp, when operating at 12 volts, requires only about 200mA. The hot resistance figures out to be ten times its cold resistance, or 60 ohms. That tidbit should be considered when picking any semiconductor device to controlan incandescent lamp.
ERROR FIX: Q1's source (Fig.3) was shown connected to C2. Source should be connected to Ground (Gnd.) Corrected.
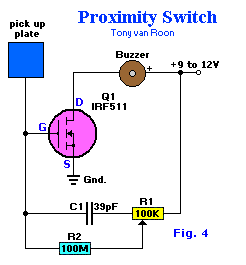
Fig. 4 is a Proximity Switch. This design takes advantage of the ultra-high input impedance and power-handling capabilities of the IRF511 to make a simple, but sensitive, proximity sensor and alarm driver circuit.
A 3x3-inch piece of circuit board (or similar size metal object), which functions as the pick-up sensor, is connectedto the gate of Q1. A 100 MegaOhm resistor, R2, isolates Q1's gate from R1, allowing the input impedance to remain very high. If a 100-MegaOhm resistor cannot be located, just tie 5 22-MegaOhm resistors in series and use that combination for R2. In fact, R2 can be made even higher in value for added sensitivity.
Potentiometer R1 is adjusted to a point where the piezo buzzer just begins to sound off and then carefully backed off to the point where the sound ceases. Experimenting with the setting of R1 will help in obtainin the best sensitivity adjustment for the circuit. Potentiometer R1 may be set to a point where the pick-up must be contacted to set of the alarm sounder. A relay or other current-hungry component can take the place of the piezo sounder to controlalmost any external circuit.


 Connect the 'Source' of the MosFet to the meter's negative (-) lead.
 When MOSFETS fail they often go short-circuit drain-to-gate. This can put the drain voltage back onto the gate where ofcourse it feeds (via the gate resistors) into the drive circuitry, prossibly blowing that section. It will also get to any other paralleled MosFet gates, blowing them also.


